 Virtual Colossus
Quick-start tutorial
This is a quick-start tutorial for the Virtual ICT 1301 computer simulation. Flossie, serial number 6, the first of its kind off the production line and in storage at The National Museum of Computing, is the oldest original second-generation electronic stored-program computer in the UK.
Moving around
The site can be viewed on a smaller mobile device, but to use the simulation properly you really need a larger screen, a keyboard and a mouse, so we’ll assume you’re on a PC or Mac.
There are two modes, switched between with the mouse button. The current mode is shown at the bottom left of the screen: use mode, shown by a pointing finger, and view mode, shown by an eye.
In view mode, click the mouse button to switch to use mode. In use mode, click anywhere that isn’t a control (the background is a good choice) to switch back to view mode.
View mode
In this mode, move the mouse to look around and at the controls you want. Move around using the W, A, S and D keys (forward, left, back and right).
Walk around to look at the computer.
Use mode
In this mode, a cursor appears on screen, so you can click on some of the switches, dials and buttons to control the computer.
Other controls
- Shift
- Works in either mode, lowering or raising your point of view (like sitting down or standing up). If you sit down near the chair, you are moved into a good position to reach the console.
- P
- Opens and closes the printer cover (you can also click the clear cover in use mode).
- C
- Moves you straight to a view in front of the console.
- L
- Throws one line feed on the printer.
- 1, 2, 3
- Set the control register dial.
- B
- Changes the arithmetic register dial.
- N
- Opens the store viewer, which shows the data in both the immediate access store (the core store memory) and the drum stores, for debugging.
Loading your first program
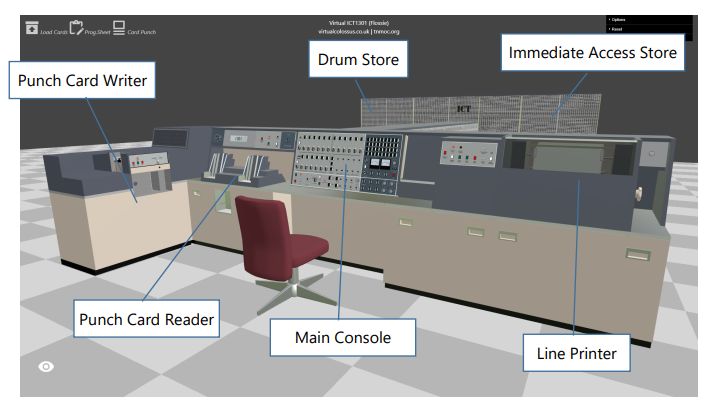
Move to the punched card reader. The hopper on the right is the input hopper for your punched cards, and the one on the left is the output hopper for cards once they’ve been read.
To load a pack of punched cards, click the Programs icon at the top left of the screen. Make sure the drawer selected is Programs (NORMAL), then choose TIMINGTEST.
You should get a message that 7 cards have been loaded into the input hopper.
Move to the main console and press Shift to sit on the chair. In view mode, move your view to get as much of the console in as possible, then switch to use mode.
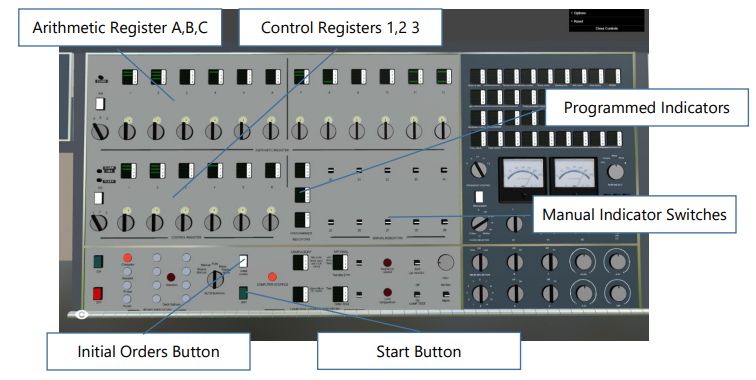
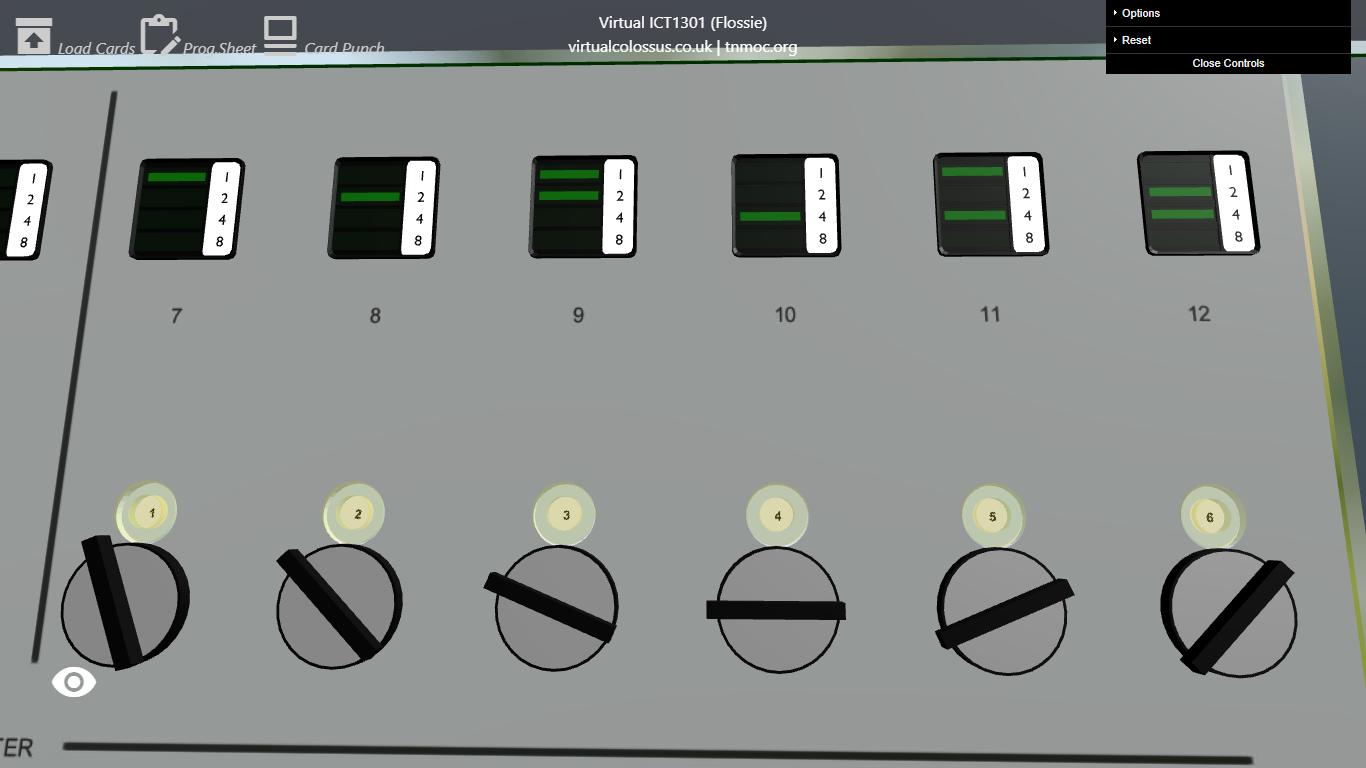
At the top of the console are the three arithmetic registers, A, B and C. Each can store and work with a 12-digit number. Each digit is stored as BCD (binary-coded decimal). You can see the numbers 1 to 6 in the picture.
Register A is mostly used to get data to and from the immediate access store (IAS, our core memory) and the storage drums. Register B is our workhorse while working with data, and register C is mostly used when reading data from the punched card reader, but can also be used for our own purposes. To see each register’s value, use the dial at the top left marked A B C: click and hold on the dial, then drag left or right to change it.
To change the value in a register by hand, use the dials below, set the same way by clicking and dragging. Each dial can be set from 0 to 15. When you have the number ready, press the white Set button just above the ABC dial to store it.
The section marked Control Registers 1, 2, 3 holds our three program counter registers, which show the next commands to be run as 6-digit values. Use the dial marked 1 2 3 to look at and change them, exactly as above.
To load our program, we first need to load the Initial Orders: a predefined program permanently stored in a special section of the first storage drum. This is the bootstrap program that tells the computer how to load a more complex program into memory and run it. Pressing Initial Orders loads the three control registers with a fixed set of commands that load the Initial Orders from the reserved part of the drum, then run them from address 200 in the IAS.
Set the control register 1, 2, 3 dial to 3.
The third control register will show 1 in each of its six displays if the card pack loads correctly and is ready to run.
Press the green Start button just under Initial Orders to start loading the program.
If all goes well, you should see 111111 in control register 3, and a report from the simulator that everything is loaded and ready. If you check the punched card reader, the cards we loaded should now be in the output hopper on the left.
This is a very small program that lights each of the programmed indicators in turn (the lights in the centre of the console), puts them out again, then adds 1 to register B.
Set the arithmetic register A, B, C dial to B, then press the green Start button again to start the program.
You should see the programmed indicators flashing and register B counting! This program pauses if you set manual indicator 29.
Click the manual indicator marked 29 and drag it down.
The program is still running (the control registers are still changing), but it is paused in a loop. Click and drag manual indicator 29 back up to carry on. It runs a little too fast to see the detail, but on the ICT 1301 you can run a program slowly, command by command, to see what it is doing and debug it.
Turn the dial marked Auto Manual left to Manual.
This stops the program at the current command (the Computer Stopped light shows it has stopped). Now each press of the Start button steps the program on one command at a time. If you set the Auto Manual dial to Repeat Manual and press Start, the computer steps on at 3 commands a second. Set the Auto Manual switch back to Manual to stop the program.
Using the line printer
Another program tests the line printer, reading a few text-image files and printing them. The printer was 120 characters wide and could print 600 lines a minute.
To load the ASCIIART program, first make sure the current program is stopped, by turning the Auto Manual dial to Manual. Then click the Programs icon at the top left and choose the ASCIIART card pack.
Press the Initial Orders button, turn the Auto Manual dial to Auto, then press Start to start loading the cards into the IAS.
Again, you can watch control register 3 for a successful load: all its displays show 1 and the Computer Stopped light comes on.
With the program loaded, we need to choose which art data cards to load.
Click the Programs icon again and choose the drawer marked Data. At the time of writing there are three art files to load: DALI, MCCANDLES and MINION. Choose one to put its cards in the input hopper.
Press the Start button again to start the program reading cards.
You should see the register lights start to flash as the program works, and the cards start to be read from the input hopper of the punched card reader.
Stand up (Shift) and move over to the line printer at the far right of the console. Open the printer cover by clicking the glass cover in use mode, or by pressing P.
If you’ve loaded the program and cards correctly, you should see the printer creating your art. Each printed line comes from two punched cards. Look closely and you may see that it prints one line over another: this is how early programmers made a grey scale for images using only letters and numbers.
Entering a data value by hand
The console registers can be used to enter data for a program. There is an example in the card pack called HAILSTONES.
Hailstones (the Collatz conjecture) asks whether two simple calculations, repeated on any starting positive number, will always end up at one. It has yet to be proved, but people have tested very large numbers by brute force, and so far it has always held.
The rules are: if a number is even, divide it by 2; if it is odd, multiply it by 3 and add 1. Think of a number and keep applying these two rules, and the number may rise and fall for a while (like a hailstone in a cloud), but will eventually drop to 1.
Load the HAILSTONES program as above (Manual mode, load the cards, Initial Orders, Auto, then Start) and check that it has loaded correctly.
The program expects the starting number to be in register B when it starts.
Set the register A, B, C dial to B, then enter a six-digit number by turning the dials under digits 7 to 12, and press the Set button to load it into register B. Make sure the Auto Manual switch is on Auto, then press Start.
Check the printer for the output. If everything is working, you should see the current value on the left and a count of the steps on the right, until you get down to 1.
Running the card punch
The last program in this tutorial makes a punched card. PUNCHDUPL reads in a single punched card and copies its data onto a new card on the card punch (the machine at right angles to the rest, at the far left of the computer).
Load the PUNCHDUPL program as above, until you get a completed load on control register 3. Then select the Programs icon again and choose the Data drawer. There are two data cards, PUNCHDATA1 and PUNCHDATA2, each containing a message: choose one to load into the card reader.
When you’re ready, switch to Auto and press Start.
It won’t take long to read and punch the single card, which appears in the hopper on the side of the punch. The single card can be hard to see in the hopper, but an icon at the bottom of the screen shows that a card is ready. Click it to collect any cards in the output hopper and display them. If you like, you can export the card to a PDF to download and keep, which includes instructions for recreating it on the virtual card punch included with this simulation.
More information
Next, try Tutorial 1: your first instructions and program, which shows how to give Flossie instructions straight from the console and key in a small program that plays tones.
To find out more about the ICT 1301 and Flossie, including lots of data and the stories of how she was rescued and her current state of reconstruction, visit the ICT 1301 Resurrection Project or The National Museum of Computing.